References
What is Continuous Integration, Continuous Delivery, Continuous Deployment?

Continuous Integration
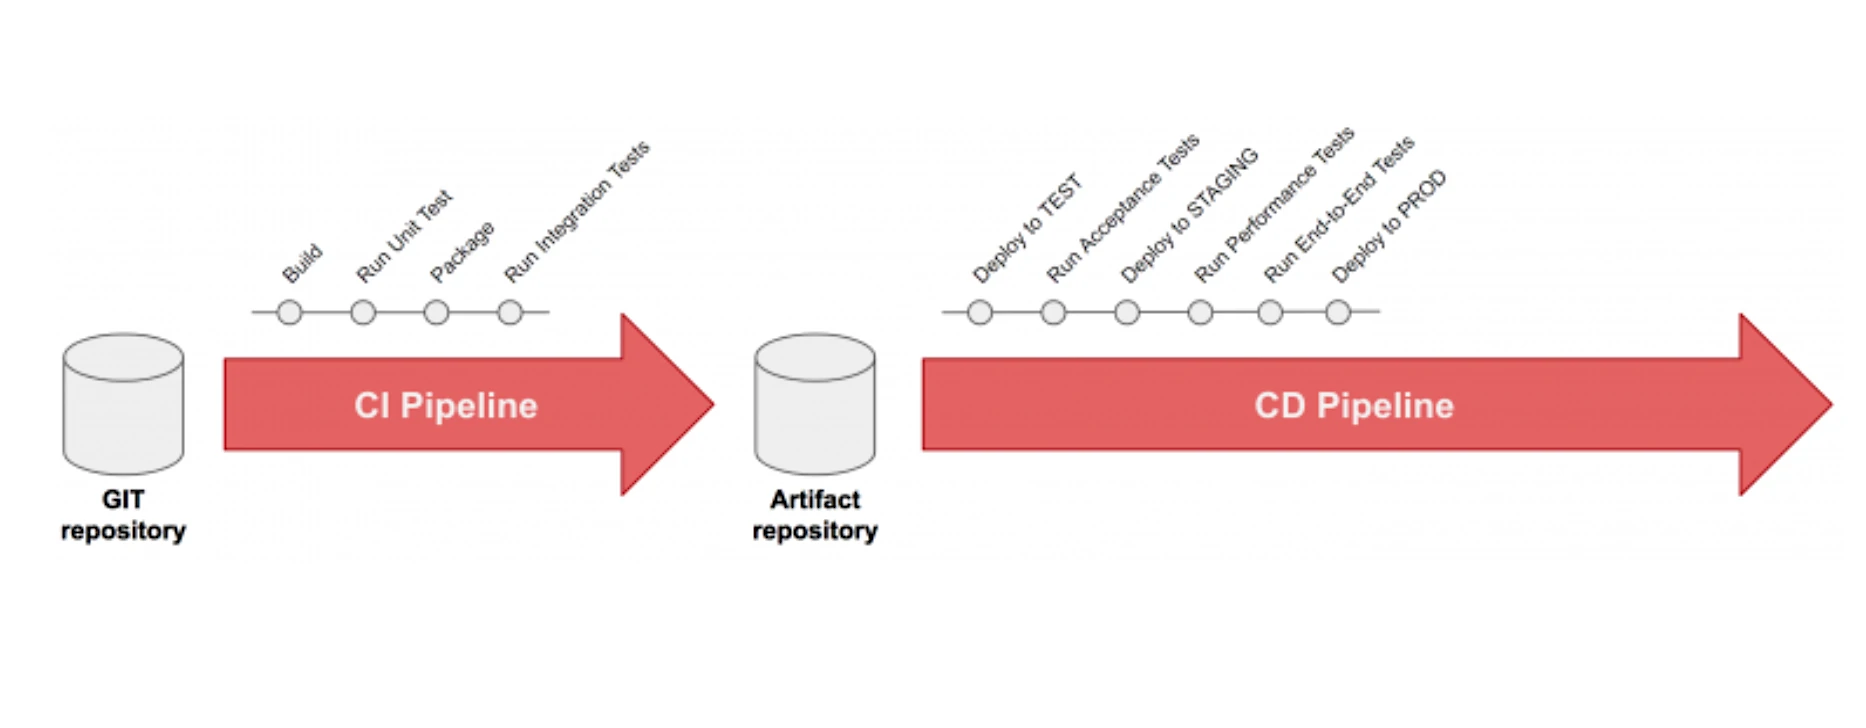
Developers practicing continuous integration merge their changes back to the main branch as often as possible. The developer’s changes are validated by creating a build and running automated tests against the build. By doing so, you avoid the integration hell that usually happens when people wait for release day to merge their changes into the release branch.
Continuous integration puts a great emphasis on testing automation to check that the application is not broken whenever new commits are integrated into the main branch.
Continuous Delivery
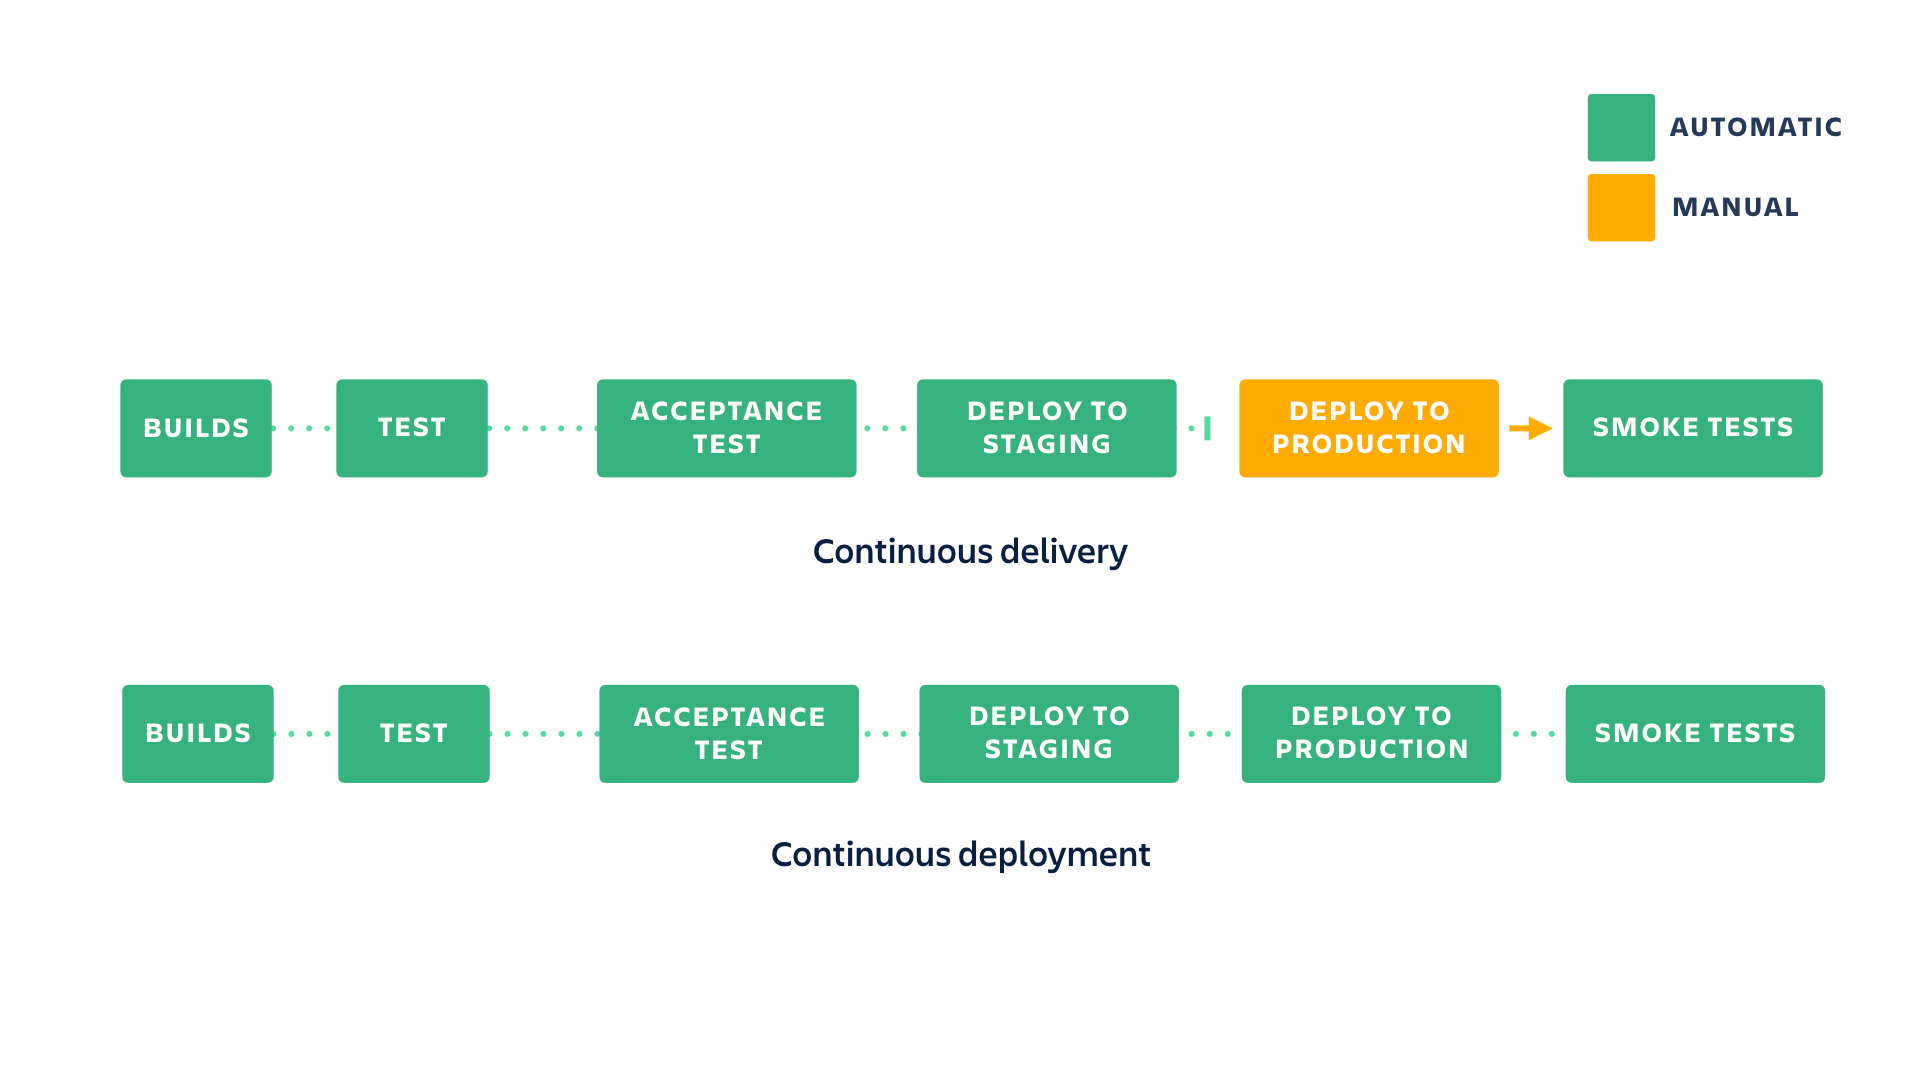
Continuous delivery is an extension of continuous integration to make sure that you can release new changes to your customers quickly in a sustainable way. This means that on top of having automated your testing, you also have automated your release process and you can deploy your application at any point of time by clicking on a button.
In theory, with continuous delivery, you can decide to release daily, weekly, fortnightly, or whatever suits your business requirements. However, if you truly want to get the benefits of continuous delivery, you should deploy to production as early as possible to make sure that you release small batches that are easy to troubleshoot in case of a problem.
Continuous Deployment
Continuous deployment goes one step further than continuous delivery. With this practice, every change that passes all stages of your production pipeline is released to your customers. There’s no human intervention, and only a failed test will prevent a new change to be deployed to production.
Continuous deployment is an excellent way to accelerate the feedback loop with your customers and take pressure off the team as there isn’t a Release Day anymore. Developers can focus on building software, and they see their work go live minutes after they’ve finished working on it.

Docker multi-stage builds
|
|
Using Bitbucket Pipelines to create a Docker image
- Automation Tool: Bitbucket
- Container Platform: Docker
- Container Registry: AWS ECR
Our first build step will handle the building of the image and pushing it to AWS ECR. Next, we will set up our trigger, so when changes are pushed/merged into the main branch it will run the build image step.
|
|
|
|
You can double check that your pipleine file is valid by pasting into the validator here: https://bitbucket-pipelines.atlassian.io/validator
At this point, you may be thinking wait where are the variables DOCKER_IMAGE and BITBUCKET_BUILD_NUMBER defined?
Bitbucket pipelines provides a set of default variables, those variables start with BITBUCKET, which makes it easy to differentiate them for user-defined variables. DOCKER_IMAGE, on the other hand, needs to be defined within Bitbucket along with 3 other variables, this can be done by:
- Going to your repository in Bitbucket
- Clicking on Repository settings in the second left menu bar
- And clicking on Repository variables under the Pipelines heading
The 4 user-defined variables:
| Name | Description | Example |
|---|---|---|
| DOCKER_IMAGE | AWS ECR URI for your image | 111111111111.dkr.ecr.ap-southeast-2.amazonaws.com/sct |
| AWS_ACCESS_KEY_ID | AWS access key associated with an IAM user or role. | AKIAIOSFODNN7EXAMPLE |
| AWS_SECRET_ACCESS_KEY | Secret key associated with the access key. | wJalrXUtnFEMI/K7MDENG/bPxRfiCYEXAMPLEKEY |
| AWS_DEFAULT_REGION | AWS Region to send the request to. | ap-southeast-2 |
Now that you have completed all that, you are ready to go on and add additional build steps to have a streamline build and deploy workflow.
Once the the Pipeline has finished, you should be able to see a new tag for your image in Docker Hub.
The three possible environment types are Test, Staging, and Production. Test can be promoted to Staging, and Staging to Deployment. It is also possible to set up multiple environments of the same type from the Deployments settings screen. This could be useful, for example, to deploy to different geographical regions separately.
Another example
Process
- Run
composer installwithin the application directory - Build a docker image and push it to AWS ECR based on the config in
environment/containers/production/eb_single_php_container_app - Make a Beanstalk version, upload it to S3 and register with Beanstalk using the configs in
environment/artifact - Allow you to deploy to Staging environment, then to Production
|
|
Require Environment Variables
Required environment variables that need to be added in BitBucket for the pipelines to run correctly.
The AWS Access Key used here will require write access to a bucket to store Beanstalk versions and read/write access to AWS ECR.
| Name | Description | Example |
|---|---|---|
| AWS_ACCESS_KEY_ID | AWS access key associated with an IAM user or role. | AKIAIOSFODNN7EXAMPLE |
| AWS_SECRET_ACCESS_KEY | Secret key associated with the access key. | wJalrXUtnFEMI/K7MDENG/bPxRfiCYEXAMPLEKEY |
| AWS_DEFAULT_REGION | AWS Region to send the request to. | ap-southeast-2 |
| DOCKER_IMAGE | AWS ECR URI for your image | 111111111111.dkr.ecr.ap-southeast-2.amazonaws.com/sct |
| BUILD_BUCKET | S3 Bucket name where builds will be stored | ct-builds-configs20190605042428563200000001 |
| BUILD_PATH | Path in S3 Bucket to store builds | builds/sct |
| APP_NAME | AWS Beanstalk application name to register version with | EB Single Container App |
| APP_ENV_STAGING | AWS Beanstalk application environment name for Staging | eb-single-container-app-staging |
| APP_ENV_PRODUCTION | AWS Beanstalk application environment name for Production | eb-single-container-app-production |